Table of Contents
If you want to send us your comments, please do so. Thanks
More on comments
PC troubleshooting
Causes of issues
- Overheating. Check, on a regular basis, at least every 6 months, if the computer needs to be cleaned and clean if needed
- Check the front
- Check the fans
- Check the interior
Useful links
Memory speeds compatability
Unwanted noises
If the computer makes unwanted noises check every part gently. Do not put much strain on the parts.
Check for noise when the case is standing and lying
Check:
- The fans by stopping them for a moment by
- Disconnecting the power of the fan. Beware to do this for a very short moment for the CPU fan otherwhise the CPU might be unrecoverable damaged by overheating
- Putting your finger on the center part. Watch out for the bladed!
- The cabling
- The plating of the case
- The motherboard
- The addon cards
If something is found work out a way to eliminate the noise. Some ideas
- Reroute cabling
- Put something between the plating
- Untighten screws of fans or tighten them a bit
- Replace the fan which generates the niose
Prevention
Make shure the cabling does not put strain on connectors and other parts in the computer
Lets get to work
On this page you find a guide on how to debug a malfunctioning PC. This guide can be a bit confusing and abstract so you need to think what needs to be done in which order when you encounter an issue. Any comments are welcome.
Check if the PC operates normally after each step if there was an abnormality
Intel to AMD
and vice versa
If you had a PC with an Intel processor and moved the harddrive from that PC to a PC with an AMD processor, well, that is not going to work. In that case you have to reinstall the operating system.
If you get no video output on the monitor
Some possible errors
- Defunct video card
- Swap the video card
- Insert an extra video card
- No keyboard
- Try an other keyboard
- Try an USB keyboard in steed of an PS/2 one
No boot disk
- Check the bootorder in the BIOS
- Check for a left behind CD in the CD drive
- Check for a left behind diskette in the diskette drive
- Check the harddisk. See the next topic
Check the harddisk
The operating system does not get operational
- Check the harddisk for sounds
- Turn the PC off
- With your ear in the neighbourhood of the harddisk turn on the PC
- If you hear it spinning up and it makes a continuous sound continue with Harddisk errors
- If the harddisk makes no sound the heads have gotten stuck on the platters. This can be fixed by loosening the heads
- If it makes a ticking or clicking sound check the powersupply or try is the harddisk spins up on an other powersupply. If it still does not spin up the harddisk might be defective. Your data is lost unless
- you have a backup
- you are able to transfer the platters to an other identical drive
- you bring the harddisk to a data recovery company. This can be expensive
Harddisk errors
When
- The POST screen(s) are shown on the monitor and there are disk and / or S.M.A.R.T. errors mentioned
- The PC gives the normal beep when booting but it does not boot properly
then
- If possible and you do not have it already make a backup of the data on the harddisk
- If the PC boots but hangs when the operating system is loaded check the harddisk where the operating system on. A better way is to use Spinrite, on level 2 (in case of a SSD or level 5 in case of a spinning harddisk, because it will do its utmost best to recover all data. This can take a very long time
If your harddisk is all right but the PC is not operating properly follow the checklist below
Check the partitions
- Boot with the Gparted live iso form CD or USB drive
- Check if all partitions are present
- If not, boot with Rescatux live iso form CD or USB drive
- Start teskdisk
- Recover and rewrite the partition table
- Super grub2 disk live iso form CD or USB drive
- Boot the Linux partition
- In a terminal login as root
- Run grub-install --verbose /dev/sdx where x is the letter of the partition you booted Linux from
- Run update-grub
- Boot the Gparted live iso form CD or USB drive again
- Set the boot flag for the Linux partition
- Check if the desired partition has the boot flag set. If not, set it
Checking for external issues
- Check if all other cables are properly connected to the PC
- Check the monitor
- Check if the mains cable is properly connected
- Check if the mains cable is powered
- Check if the video cables is properly connected
- Check the monitor on an other PC
- Check if the monitor is turned on if not turn it on
- If the monitor has multiple video inputs check if the right input is selected via the menu or buttons
- If possible check if the monitor is operating properly by connecting it to an other computer
- Unplug any cable and device from the PC except for
- The mains cable
- The monitor
- The keyboard
- The mouse
- Check the power
- Check if the mains cable is not damaged
- Try an other poweroutlet
- Check if the mains cable is plugged in
- Check if the mains cable is connected to the mains.
- Check any switches on the power strip
- Check if the power supply is switched on on the backside of the PC
- Turn the PC on
- Check if the power light is on
- Listen if the fans are running
- Listen for any beeps. Beeps are mentioned later in this checklist
Checking for internal issues
- Precaution: After power off and disconnecting the mains press the power button to help discharging the PC
- Precaution: Discharge yourself by touching big conducting, not painted, metal parts like the inside of the case before touching any components inside the PC and connectors on the outside
- Precaution: Do not open the power supply unless you know what you are doing. In side there are dangerously high voltages which can harm you
- Precaution: Place any removed components in or on an anti electrostatic bag or on a non shiny cardboard
- Get the user manual of the motherboard. Usually it can be found on the website of the manufacturer
- Open the case
Check the cables
- Check if all cables are properly seated in the connectors
- Check for damaged cables
- Replace the cables with new ones.
Check the connectors
- One by one disconnect the cables and reconnect them
- Of the power switch
- Of the power supply
- Of the harddrive
- Of the optical drives
- Of the diskette drives
Check for unusual noises
- If the PC makes unusual noises try to locate them. The power supply will be done later
- Stop the fan of the CPU cooler for a brief moment by pressing lightly with your finger on the center disk
- Disconnect any case fans
- Power of the PC and unplug the power of the harddisk. Power up the PC
Check the airflow
It can be the case that components in the PC get to hot and thereby malfunction. Proper airflow might solve this issue. In stead of the brush you can also use canned air to loosen the dust
- Loosen the dust in the case with a brush
- Loosen the dust on any case fan with a brush
- Loosen, from the outside the dust on the power supply fan with a brush
- Loosen the dust on the CPU cooling block with a brush
- Turn the case over and let the dust fall out.
- Remove the dust which is fallen on the desk with a vacuum cleaner
- A vacuum cleaner can also be used to clean the internals of the PC but there is a risk of electrical discharge and thereby damaging the PC
- Some cases have bad airflow. Check if the air can flow proplery from the air intake to the power supply. The air intake is mostly on the front of the case. If the airflow seems not appropriate to you it is a good idea to replace the case for a bigger one. When changing the case often also a new, and probably better power supply is also needed
Check the power
- Power the PC on and check if the green power LED on the motherboard is on if there is any. Check the manual for the existe
nce and location of the LED if you can not find it on the motherboard. If the LED is not on or there is no LED
- Check if the 20 or 24 pole ATX power connector is connected properly
- Check, if applicable, if the 4 pole 12 Volt connector (two yellow and two black wires) is connected properly
- Check, if applicable, the 6 or 8 pole video card power connector(s) is connected properly
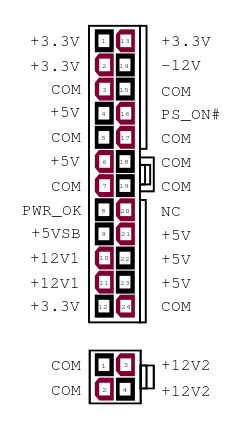
- Check if these voltages are present by measuring them on the ATX connector. Be aware that the picture of the ATX connecor is bottom view
- Ground is the black wire
- 3.3 volt Orange wire
- 5 volt. Red wire
- 12 volt. Yellow wire
- Minus 5 volt. White wire
- Minus 12 volt. Blue wire
- Check for bulged capacitors. If there are any they need to be replaced. If you do not have the time you can
- Measure the voltage across them.
- If the voltage is zero or about zero then it might be a good idea to replace these capacitors. An alternative is replacing the motherboard
- If the voltage is about a voltage to be expected then the bulged capacitors are probably not the cause of the malfunction. They need to be replaced later if the motherboard is going to be used
- Check if the CMOS CR2032 battery voltage is 3.2 volt or more. If it is not the case then replace it. Wait 10 minutes before inserting the new battery. The CMOS is cleared now. The default settings of the BIOS are loaded
Analyse POST beep and hexadecimal codes
- Analyse the beep codes if there are any. See the info on beep codes in the motherboard manual or here:
- Use a diagnostic test post card if you have one
- BIOS postcodes on BIOS central for several manufacturers
Clear the CMOS
By clearing the CMOS default or similar BIOS settings will be loaded
- Read the manual of the motherboard on how to clear the CMOS
- General method: Remove the battery and wait for 10 minutes before replacing it. See this page of Intel on how to do it: How do I clear the CMOS?
- If you can get in the BIOS sometimes the CMOS can be cleared there. See the manual on how to do it
- To clear the CMOS use the jumper if available
- Disconnect the mains.
- Press the power button
- Wait for a minute
- Clear the CMOS:
- On a Gigabyte motherboard put a jumper on the clear CMOS pins for 10 seconds and remove it
- On motherboards of other manufacturers
- Put the clear CMOS jumper in the clear CMOS position
- Wait 10 seconds
- Put the jumper in the other, storage, position
- Continue testing
Analyse components
- Remove all removable parts and connectors one by one form the motherboard and test the PC after every removal. Do not remove the CPU and the CPU fan. Disconnect:
- The reset switch
- Optical drives
- Diskette drives
- Harddisks
- Remove
- The power light connector
- The harddisk light connector
- The power switch connector
- Remove any addon cards except for the video card
- Remove the video card
- Remove the memory sticks one by one
- When all memory sticks are removed reseat one memory stick. Try this memory sticks in all slots
- Repeat this for the other memory sticks ( if was more than one memory sticks in the motherboard )
- Disconnect the PC speaker connector
- Disconnect any internal cables which are not disconnected yet
- Test the power supply for making unusual noise
- Disconnect all cables on the power supply
- Connect the power supply to the mains
- If it makes unusual noise the fan probably needs replaced. Warning: Replace the fan only when you know what you are doing. There are dangerously high voltages inside the power supply which might harm you. You can also get an other power supply
Test the motherboard
When something is wrong the leds of the keyboard might blink. See the blink code page for the code evaluation
- Remove the motherboard from the case
- If the motherboard has bulged capacitors replace these capacitors
- Check for short circuits
- Connect to the motherboard
- A separate power switch
- A separate speaker
- The keyboard
- The Monitor (if it has onboard video
- The videocard if it has no onboard video
- Connect a monitor to the video card
- From the Powersupply
- The ATX connector
- The 12V connector if applicable
- Connect the mains to the powersupply
- Repeat the applicable tests from above
- If you have spare parts you can swap them with the parts which were on the motherboard
- Again repeat the applicable tests from above
- If the system still does not work the motherboard is probably the problem. Replace the motherboard
- If there is an other motherboard
- If it is an second hand or old motherboard check it for bulged capacitors
- Swap the CPU with its fan over to the new motherboard
- Start testing again using the above procedure backwards (more or less)
HDD issues
- Run Spinrite on level 5 on the drive.
- Replace the cable and connect it to an other connector. This is the fastest way to check if the drive or the cabel / motherboard are the issue.
- If this does not solve the issue
- Check the drive in an other computer
- Replace the drive
- Replace the motherboard
Stress testing
Run the CPU at full load (n is the number of (hyperthreaded) cores)
stress --cpu n --verbose
Post troubleshooting
- When everything works fine and Spinrite is available test the harddisk on level 5
- Make a backup of you data if you have not done it already
Cases
No GUI
- The PC boots
- The text based interface works
- A mousepointer appears and disappears
- The screen gets pink
- Ping to this computer: no reaction, 100% packet loss.
- Two boots previous, half a hour earlier the network still worked.
- It seems the computer is breaking down.
- When booting from a Parted Magic disk the same occurs, now the screen gets grey.
- Conclusion: at least a network and a graphical issue.
- Maybe it can be solved by putting in a PCI video and network card and disabling the internal video and network devices
- Probable cause: Not cleaning the dust out of the fans and the case on a regular, at least once every six months, basis
No Network
If possible log in into the GUI.
- Check in the networkmanager
 Ethernet tab if the right network interface is selected
 - Check in the networkmanager IP4V Settings tab if the right DNS server is selected

Tools
These are bootable iso files
| Disk | Remark |
|---|---|
| Boot repair disk | Might earase a partition under some circumstances |
| Rescatux | |
| Super grub2 disk |
Main subjects on this wiki: Linux, Debian, HTML, Microcontrollers, Privacy
RSS
Disclaimer
Privacy statement
Bugs statement
Cookies
Copyright © : 2014 - 2024 Webevaluation.nl and the authors
Changes reserved.